Monday, 2 January 2023

GIT remove last commit or go to previous commit

 If you commit the changes by mistake and want to remove that commit or want to go to the last commit then here are some simple commands.


In my example, I have added comments in the code and committed it.

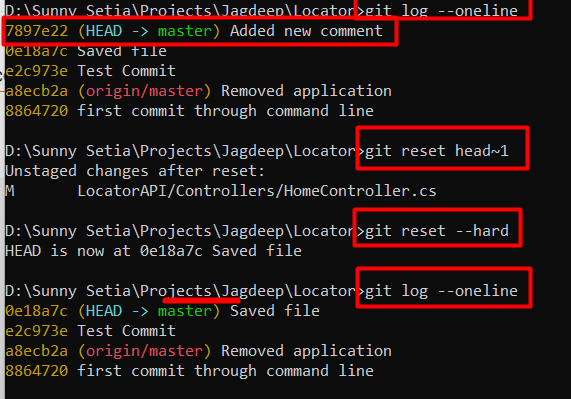
Step 1: Run the command on Command Prompt / Terminal


    git log --oneline


It will display all the recent commits. In my example, I have recently committed "7897e22". Not, I want to go to the previous commits.


Step 2: Run the next command
    

            git reset head~1  (or)

            git reset 0e18a7c


Either you can go to the previous commit by (head~1) or you can specify the Id by checking from the git log.


You can use any one of the above commands.


Step 3: Once you run this command, you can see your changes in the Git Changes. If you want to delete all the changes then You can run the reset hard command. Please run this command carefully. If will remove all the recent changes.

       git reset --hard


Now, if you will check the git log again, you can see recent commit has been removed from the log.


If you only want to revert the changes and do not want to delete them from the log then you can follow the below article.
https://setiasunny.blogspot.com/2023/01/revert-git-changes-through-terminal.html

I hope you like the article. Thank you for reading this.


Wednesday, 9 November 2022

How to reset Azure VM username or password?

If you've forgotten your Azure VM username or password, don't worry. Resetting your username and password is easy through Azure Portal.

Below are the steps.

Step 1: Go to Azure Portal and select your VM.
Step 2: Under the options, you will find the Reset password option.


Step3: Enter your new username and password and click update on the top


Hurrah, now you can easily connect VM with your new username and password.


Monday, 4 July 2022

Important SQL Queries

 Here we will discuss some of the important SQL queries.

  • Get Database list

        SELECT name as DB_Name,create_date as CreatedDate
        FROM sys.databases

  • Get row count in all the Database tables

           SELECT QUOTENAME(SCHEMA_NAME(sOBJ.schema_id)) + '.' +                                                     QUOTENAME(sOBJ.name) AS [TableName]
           ,SUM(sPTN.Rows) AS [RowCount]
           FROM  sys.objects AS sOBJ  INNER JOIN sys.partitions AS sPTN
           ON sOBJ.object_id = sPTN.object_id
           WHERE sOBJ.type = 'U'    AND sOBJ.is_ms_shipped = 0x0
           AND index_id < 2 -- 0:Heap, 1:Clustered
           GROUP BY sOBJ.schema_id , sOBJ.name
           ORDER BY [TableName]

  • Recent Modified stored procedures and tables

        SELECT name, create_date, modify_date ,type
        FROM sys.objects
        WHERE type = 'P' or  type = 'U'
        ORDER BY modify_date DESC


  • The last query runs on the database

          SELECT  text,*
          FROM    sys.dm_exec_query_stats AS deqs
          CROSS APPLY sys.dm_exec_sql_text(deqs.sql_handle) AS dest
          WHERE   deqs.last_execution_time > '5/16/2022'
          order by creation_time desc


  • Check user roles in the database

          SELECT ServerName=@@servername, dbname=db_name(db_id()),
           p.name as UserName, p.type_desc as TypeOfLogin, 
          pp.name as PermissionLevel, pp.type_desc as TypeOfRole 
          FROM sys.database_role_members roles
          JOIN sys.database_principals p ON roles.member_principal_id = p.principal_id
          JOIN sys.database_principals pp ON roles.role_principal_id = pp.principal_id

  • CTE for Recursive Query

    WITH CTE AS      
    (        
    SELECT 1 Number        
    UNION ALL        
    SELECT Number + 1 FROM CTE WHERE Number<20        
    

    SELECT * FROM CTE

  • Create a new user from the query

        CREATE LOGIN [ServiceUser] WITH PASSWORD = 'Admin@27'
        CREATE USER [ServiceUser] FOR LOGIN [ServiceUser] WITH DEFAULT_SCHEMA=[dbo]

Note: Run Create Login query on Master DB, Run User Query on specific DB access.

If you want to create a new login for an Azure AD user then run the below query on Master DB


  CREATE LOGIN [ademail] from external provider;

If you want to create a user in the specific DB then use the below query

CREATE USER [User1] WITH PASSWORD = 'Test@12', DEFAULT_SCHEMA = dbo; 

Assign Roles to newly created User

        EXEC sys.sp_addrolemember 'db_datareader', 'serviceuser';
        EXEC sys.sp_addrolemember 'db_datawriter', 'serviceuser'; 
        EXEC sys.sp_addrolemember 'db_owner', 'ServiceUser';

If you got an error, Login failed. You need to check whether mixed Authentication is enabled or not. Run below query.

SELECT SERVERPROPERTY('IsIntegratedSecurityOnly');

  • If the result is 1, it means Windows Authentication mode is enabled (SQL Server logins are disabled).
  • If the result is 0, Mixed Mode (Windows and SQL authentication) is enabled.

    Change to Mixed Mode Authentication:

    1. Open SQL Server Management Studio (SSMS).
    2. Right-click on the SQL Server instance and select Properties.
    3. Go to the Security page.
    4. Select SQL Server and Windows Authentication mode (Mixed Mode).
    5. Restart the SQL Server service.
    • While loop

          DECLARE @ComponentCode int=0
          WHILE EXISTS (SELECT 1 FROM QualityList WHERE QualityId > @ComponentCode)       BEGIN SELECT @ComponentCode = MIN(QualityId) FROM QualityList WHERE QualityId > @ComponentCode SELECT @ComponentCode      END

    • Drop all tables
        SELECT  'DROP TABLE [' + name + '];' FROM    sys.tables

         Run the query copy all the table commands and execute.

    • Remove all Stored Procedures with Query
    DECLARE @procedureName VARCHAR(500)
    DECLARE cur CURSOR
     
        FOR SELECT [name] FROM sys.objects WHERE TYPE = 'p'
        OPEN cur
        FETCH NEXT FROM cur INTO @procedureName
        WHILE @@fetch_status = 0
        BEGIN
            EXEC('DROP PROCEDURE [' + @procedureName + ']')
            FETCH NEXT FROM cur into @procedureName
    END
    CLOSE cur
    DEALLOCATE cur

    • Calculate SQL/Azure SQL Database Size

            SELECT (SUM(reserved_page_count) * 8192) / 1024 / 1024  AS DbSizeInMB
    FROM sys.dm_db_partition_stats

    Friday, 11 February 2022

    AADSTS50076: Due to a configuration change made by your administrator, or because you moved to a new location, you must use multi-factor authentication to access

     How to Get Access Token from Postman when you have an MFA enabled in the AD


    First, Let's learn how to get an access token if MFA is not enabled.
    To get the token you need to pass the below parameters.

    • grant_type (password - hard code)
    • client_id
    • client_secret
    • scope (user.read)
    • username (AD username)
    • password (AD password)


    For TenantId, ClientId and Client_Secret. You can log in to the Azure portal and then the Azure active directory --> App Registrations --> Check your app registration or add new registration.


    Once you call this method, you will get the access token.

    Note: If MFA is enabled then you will get the below error.


    To solve this issue, you need to follow the steps below.

    Step 1: You need to open the URL in the browser mentioned below. Make sure to add your tenantId, clientId, and redirect URL. Redirect URL, you can set any value in the redirect URL in App Registration of Azure Portal and pass the same redirect URL here.

    https://login.microsoftonline.com/{{tenantId}}/oauth2/v2.0/authorize?
    client_id={{clientId}}
    &response_type=code
    &redirect_uri=https://localhost:44321/
    &response_mode=query
    &scope=https://graph.microsoft.com/User.Read
    &state=12345


    The snapshot below explains that you can get a set redirect URL in App Registration.


    Step 2: Copy the URL and paste it into the notepad. You will see this URL has 3 parameters 
    • Code
    • State
    • Session_state

    Copy only the code part.


    https://localhost:44321/?code=0.AUUAV8CEcnhAcEGSwBvLEcVSaUBShxdFPBtDqBWzMDbIrtRFAH4.AQABAAIAAAD--DLA3VO7QrddgJg7WevrOJWL51jAIIL76f1jPOMwfGpCGDOkHmxnYhixC2A4SFRJE5cf_AOpaELqjrxJA-MbPvCIBDfWLZtjo2zVw2AQ2CfagTN2gMsErjuSsTzsFNwg7AGEMBZ1D_hpekpVjwS7OpliDUAL1iS4fiUq0iWWbDZNohQFFtQbgmKLh-EKCuyFRyqMSiZZPOW20S6J-6r6TCB-SPMEG7RrlsWaXMxLuSJpripTV9_4FlXJg0oZmvogiGmuVQ9U1ckhTsMZmFps4F-3PNxEZRXAvLFEbDQPP5KnB8zGKGB_px5B5m1NTDkKhck9-WW0yTVeJiuyTmbtofvu1exYQLJv8we6F11rUaEG6ogtW6qAZQbOElIrtNQ_aYQ5Gkd9KUnJNFOFGmtEsVXAhxVfFZ6uFLio6TzjcDm12u_CUNeewDCrR5QuOK1JrDeq2yjHx3lD-h0SMAFD6CG5K6vqpwgv7MqVPONJas09AvD3rQpoFgpGuSF997NJiCguYPkXpW6fYYH9-1aJE9Qob3GGzlcSCTO0OBseN95oprKTT4246scT-_VsOXMca36bgPOsNDPMRfxTy9nSZaZmugJDxlijfKEUXcYbFtUZjKD2Cz3OQC1rGJF03db7cOdYuRGCSTy-C28CnYikIAA&state=12345&session_state=9e429398-8f47-4210-a2b4-72866178d144#


    Step 3: Call the endpoint again in the postman. This time parameters are different. We need to pass below 5 parameters. The code parameter is where we need to paste that code.

    • grant_type (authorization_code - hard code)
    • client_id
    • client_secret
    • code (authorization code that you recently get from the browser)
    • redirect_uri (same that you passed in the above parameter)


    Once you send the request, you can see you have an access token.


    Now you have your access token. I hope you like the article. Thank you.

    Thursday, 26 August 2021

    Not receiving an email in Google Workspace formerly (G Suite)

    MX Settings

    In this article, we will learn how to do the MX Setting for Google Workspace formerly(G Suite). First, let's learn how to set up Your personal email Id.

    Step 1: Go to https://workspace.google.com/ and click on the Start Trial button.

    Step 2: Fill in the information. I have selected the Just you option for myself.


    Step 3: Fill in the contact information.


    Step 4: I hope you already have the domain and press the domain below.


    Step 5: Enter your domain name.


    Step 6: Enter the email Id that you want to create.


    Step 7: Your account is ready.


    Step 8: Verify your domain, once you will verify it will automatically insert entries in your domain provider DNS settings. 


    In my case, I have purchased a domain for GoDaddy. and you can see the setting in DNS Section. Go to the Manage DNS section in your domain settings(GoDaddy portal).


    In DNS Management, you can find below verification TXT code is already there.


    Note: We need to do Mx settings that we need to add manually. If you will not do these settings, you will not receive an email. These MX settings are common for all users/domains. You need to press the add button and do the entry like below


    As shown in the snapshot below, you need to do 5 entries.


    Once you do all the settings. You will start receiving emails in 10-15 mins. This is all about this article. I hope you like it.

    Sunday, 30 May 2021

    SQL Server: Remove SQL Express from Server Name

    We will learn how we can convert named instances to default instances. We will connect the server without writing SQL Express. 


    Step 1: Open SQL Server Configuration Manager. Search in the laptop for SQL Server Configuration and select as shown in the snapshot below.


    Step 2: Click SQL Server Network Configuration and Click Protocols for INSTANCENAME (i.e SQLEXPRESS)


    Step 3: Right Click TCP/IP and click Enabled

    Step 4: Right-click TCP/IP and go to Properties, Click on  the IP Addresses tab and scroll down to the IP All section

    Step 5: Clear the field TCP Dynamic Ports (i.e. empty/blank) and set TCP Port to 1433. Press Ok


    Step 6: Go to SQL Server Services and Right-click your SQL Server (INSTANCE NAME) and click Restart 


    This will make the named instance listen on the default port. Now, you no need to write SQL Express in the Server Name.


    Tuesday, 4 May 2021

    Create Azure Key Vault and Access in Asp.Net Core Application

    Azure Key Vault is a cloud service that helps teams securely store connection string, passwords, etc, and access them. Today in the article we will learn how to create the Key Vault in Azure Portal and how to access secrets in our code. 


    Step 1: Go to Azure Portal and search Key Vault and create it. 


    Step 2: Enter Key Vault Name, Resource Group, Region, etc as mentioned the below screenshot.

    Press Review + Create button. 


    Step 3: It will check validation in the background and it will create a new Key Vault. 


    Step 4: Click on Your Key Vault and go to Secrets and Press Generate/Import button.


    Step 5: Create a new secret with any name. I have created a new secret dbpwd. Press Create button.


    Till now, we have created the Key Vault in the Azure Portal and created the secret too. Let’s fetch this secret value in the Code. Let’s create a sample in Asp.Net Core API application and fetch the secret.


    Create/Open Visual Studio Web/API application. In my example, I have created Asp.Net Core 3.1 Application.


     Step 1: Go to Program.cs, In line number 35, I have specified my Key Vault URL. You can specify your Key Vault URL. if you are not aware of your URL then go to Azure Portal and click on the Key Vault and see in the Overview Tab. You can find the URL.


    Note: I have used default credentials in line 27. I have logged in to Visual studio with the same credentials as I'm logged in on the Azure portal.


    Step 2: Go to Controller and fetch Key Vault Secret.


    I have created a new endpoint, kV, and fetch the secret value.


    Step 3: Run the API Project


    You can see it fetched the secret value in the browser. This is all about this article. I hope you like it.


    How to get PowerBI Embed Token

     Here's a step-by-step guide to help you through the process. Step 1: Register Your App in Azure 1. Go to Azure Portal → App registratio...