Friday 23 October 2015

Typing Tips & Tricks


Typing Tricks


Below are the few useful typing tricks that help you to speed up your work.

1) Delete the word  


As you all already know by pressing the Backspace will delete single character. However, pressing the CTRL + Backspace will delete the whole word behind the cursor. It is very helpful  particularly Microsoft programs like Word or Outlook.

2) Paste plain text that you copied  


Usually when you copy text from any website or any other source, it will usually copy formatting(means font size and style) that comes with it. To paste this as plain text, press CTRL + ALT + V instead of the standard CTRL + V, and the system will show a 'paste special' dialog box. Select option and system will paste unformatted text.

3) Move Cursor to beginning of the next or previous word  


To speed up your work, move the cursor around with keyboard shortcuts. To move it to the beginning of the previous word, use CTRL + Left Arrow. To move it to the beginning of the next word, use CTRL + Right Arrow.


This is all about article. Hope you like it.

Change Rows to Columns - Pivot in SQL Server

PIVOT


In this article, we will discuss PIVOT keyword in Sql Server. Pivot is responsible to  convert Rows to Columns in Sql Server.

Let's take the example.

Step 1: Declare SQL table and add some dummy data

DECLARE @ScoreTable TABLE
(
MatchType VARCHAR(50),
Year INT,
Score  INT
)

INSERT INTO @ScoreTable VALUES('OneDay',2012,1000)
INSERT INTO @ScoreTable VALUES('Test',2012,2200)
INSERT INTO @ScoreTable VALUES('OneDay',2013,800)
INSERT INTO @ScoreTable VALUES('Test',2013,370)
INSERT INTO @ScoreTable VALUES('Test',2014,1100)


Step 2: Run the Select query and see the default data

This is not mandatory step. However, just check you dummy data.

SELECT * FROM @ScoreTable


In above query, you can see we have 3 columns. MatchType, Year and Score.
We will change Year Rows data in Columns.


Step 3: Write query to covert rows to columns


SELECT * FROM @ScoreTable
PIVOT(SUM(Score)
FOR Year IN ([2012], [2013],[2014])) AS PVTTable


In above snapshot, you can see query changed year to columns and score under each column.


This is all about the article. I hope you like it.


Wednesday 21 October 2015

Parent and Child Relationship in the Same table - SQL Server


Parent and Child Relationship


In this article, I'll explain the parent and child relationship in the same table.

Let's take the example by declaring the SQL table and insert some records.

Step 1: Declare the table and add some dummy data

DECLARE @table TABLE
(
Id INT,
Name varchar(50),
ManagerId INT

)
INSERT INTO @table VALUES(1,'Sunny',2)
INSERT INTO @table VALUES(2,'Nitin',4)
INSERT INTO @table VALUES(3,'Amit',5)
INSERT INTO @table VALUES(4,'Sumit',1)
INSERT INTO @table VALUES(5,'Jay',null)

SELECT * FROM @table

When you run the query and you will find below result


In the above snapshot, User belongs to the following manager. We need output as below.

Sunny - Nitin
Nitin - Sumit
Amit - Jay
Sumit - Sunny
Jay - No Manager Assigned


Step 2: Write a query to achieve the desired result.

1. With Help of Join

SELECT a.Name,b.Name as ManagerName
FROM   @table a left join @table b on
 b.Id = a.ManagerId


2. With Help of Sub Query

SELECT a.Name, (SELECT b.Name
                       FROM @table b
                       WHERE b.Id=a.ManagerId)as ManagerName
FROM   @table a


Step 3: Output would be the same for the above 2 queries.


This is all about the article. I hope you like it.


Monday 19 October 2015

New in Visual Studio 2015


Features of Visual Studio 2015


There are many features in Visual Studio 2015. In this article we will discuss top 5 features of Visual studio 2015.

1. Debug Lambda Expressions


The best feature in VS2015 that developer is waiting for so long. Earlier we were not able to debug Lambda expression. Now you can debug the code and see the result in Immediate window as shown in below snapshot.


2. Yellow Light Bulb


This feature is similar to Resharper. It will give you suggestions. Here in below shapshot when you click on Yellow bulb, it will show some suggestion related to missing reference.


3. IntelliSense for Angular


Visual studio will display the Intellisense for Angular. Just write ng in div tag. It will show the list of ng tags as shown in screenshot below.


4. IntelliSense for Bower and NPM

In Asp.Net 5 project, you will find Bower, Gulp and NPM in new template.
Microsoft provide Intellisense for both Bower and NPM.

Bower:  Bower is for client side packaging for e.g. Jquery and Angular.
NPM: NPM is for developer tools for e.g. Grunt, Gulp


5. References Counts

On the top of each Method, Property and Class you will find reference count. This feature is available in Visual Studio 2013 updated version. However, you will find here in Visual Studio 2015 as well.


When you click on 4 references text, you will see list of references as shown in screenshot below.


This is all about the article. I hope you like it.


Thursday 15 October 2015

SQL Server - Caluclate column sum on each Row

Running Total in SQL Server


In this article I'll explain how we can get running total on each row.

Let's take the example.

Step 1: Declare Sql Table

DECLARE @TempTbl TABLE  
(
  Id INT IDENTITY(1,1),
  Score INT
)

Step 2: Insert dummy records in the table

INSERT INTO @TempTbl(Score) VALUES(10)
INSERT INTO @TempTbl(Score) VALUES(20)
INSERT INTO @TempTbl(Score) VALUES(30)
INSERT INTO @TempTbl(Score) VALUES(40)
INSERT INTO @TempTbl(Score) VALUES(50)

Step 3: See the records in table

This is not mandatory step. However, check everything is fine.

SELECT * FROM @TempTbl


Check you table has above records.

Step 4: Write the query to get running total

There are many ways to get running total. I'll explain 3 ways.

1. With help of Sub query

     SELECT Id, Score,
(
   SELECT SUM(b.Score)FROM @TempTbl b 
   WHERE b.Id <= a.Id
 ) as Total
     FROM   @TempTbl a

2. With help of Join
     

    SELECT a.Id,a.Score,SUM(b.Score) as Total
    FROM   @TempTbl a, @TempTbl b
   WHERE b.Id <= a.Id
    GROUP BY  a.Id,a.Score

3. With help of Over (Only for SQLServer 2012 and above)

     SELECT a.Id, a.Score, SUM(a.Score) OVER (ORDER BY a.Id) as Total
     FROM   @TempTbl a

All 3 options will give the same output as shown in below screenshot. See the Total column, it is showing running total of Score column.


That is all about this article. I hope you like it.

Wednesday 14 October 2015

Window Service in Asp.Net C#


Window service


Window service is the application that run in background and perform various tasks.

How to create window service?

Its very easy to create window service. Follow the steps mentioned below

Step 1

In visual studio 2013,  File --> New Project --> Visual C# --> Windows Desktop --> Window Service.


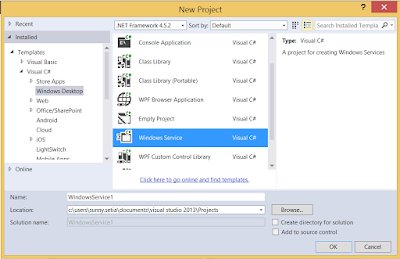
In Visual Studio 2015,  File --> New Project --> Visual C# --> Windows  --> Classic Desktop --> Window Service.


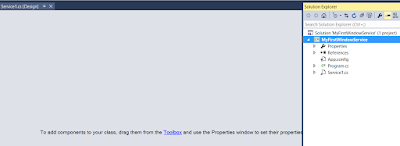
Give the appropriate name to window service. I've given MyFirstWindowService and press ok.

Step 2


From Solution explorer select Service1.cs file and rename file to your appropriate name of the service. Let's give the name MyService.
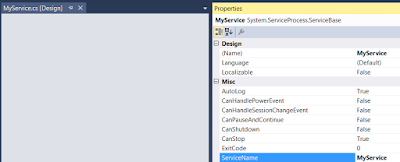


Step 3


Right click on MyService.cs designer file and click properties as per below screenshot and changed the ServiceName.


Step 4


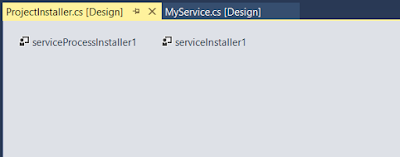
Right click on MyService.cs designer file again and click AddInstaller option. Designer will add Program.cs file and ProjectInstaller with 2 controls

  1. serviceProcessInstaller1
  2, ServiceInstaller1


Step 5


Right click on serviceProcessInstaller1 and select properties and change Account to LocalSytem


Step 6


Right click on ServiceInstaller1 and change StartType property to Automatic and  DisplayName property.


We did all the setting now its time to write some code.


Step 7


Right click on MyService.cs file and select View Code.

You can see we have 2 methods in the file. OnStart, OnStop we will write our all code in these 2 methods. In the article service will write text in notepad file.
When service will start, It will write something in notepad. After every minute service will append date time in notepad file.

1. Initialize the timer in the code above constructor.

    Timer timer = new Timer();
        public MyService()
        {
            InitializeComponent();
        }

2. On Start Method write below lines

 protected override void OnStart(string[] args)
        {
            WriteFile("Service Started " + DateTime.Now);
            timer.Elapsed += new ElapsedEventHandler(AddNewEntry);
            timer.Interval = 60000;
            timer.Enabled = true;
        }

AddNewEntry is the method that will run after every minute. because we have set the timer interval to 1 minuete.

 private void AddNewEntry(object source, ElapsedEventArgs e)
        {
            WriteFile("New entry at " + DateTime.Now);
        }

3. OnStop Method

 protected override void OnStop()
        {
            timer.Enabled = false;
            WriteFile("Service Stopped" + DateTime.Now);
        }

4. WriteFile private method

WriteFile is the private method that will write file after every minute.

 private void WriteFile(string content)
        {
            FileStream fs = new FileStream(@"E:\SunnySetia\MyService.txt", FileMode.OpenOrCreate, FileAccess.Write);
            StreamWriter sw = new StreamWriter(fs);
            sw.BaseStream.Seek(0, SeekOrigin.End);
            sw.WriteLine(content);
            sw.Flush();
            sw.Close();
        }

Code will look like below screenshot


How to install window Service?


Step 1: Open Visual Studio command prompt in administrator mode.
Step 2: Go to location where project in placed. In my example my project is located in E:\Sunny\WindowServiceVS2015\MyFirstWindowService\MyFirstWindowService 
Step 3: Install the exe file located in bin\debug folder.
Step 4: For installion, you need to use installutil command as per below screenshot.


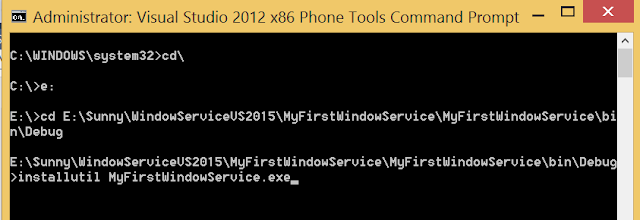
Step 5:
Press enter to install the window service.


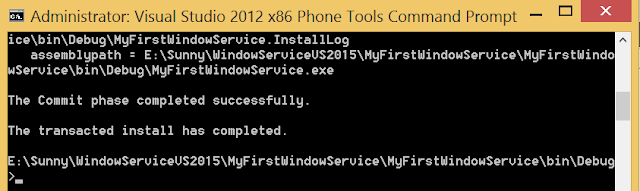
If you followed all the steps then you will get above message.

If you are getting Exception while installing the exe file then use Release folder rather than Debug folder.

E:\Sunny\WindowServiceVS2015\MyFirstWindowService\MyFirstWindowService\bin\Release.

Step 6: Go to  Start --> Control Panel --> Open Control Panel --> Select Administrative Tools --> Computer Management --> Services and Applications --> Services --> Open services

or In run command write services.msc

Now you can you service MyService in Services list. Look at the screenshot below.


Step 7: Right click on MyService and Press Start. After start
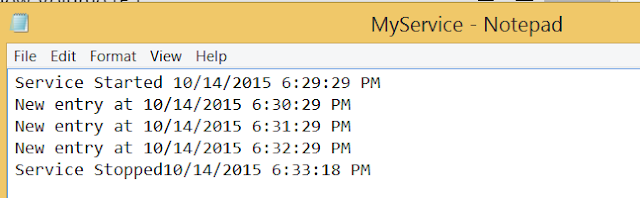
Step 8: Go to notepad file location and you can see window service writing in notepad file.


Step 9: For stopping the window service. Right click on service and press stop.
Once you stop you can see updated notepad file.


 Step: 10 For uninstalling, you need to write installutil servicename.exe -u  as below screenshot


That is all about window service. I hope you like it.

Friday 20 February 2015

What is MongoDB and How to install MongoDB and its Service

MongoDB


MongoDB is an open-source, document-oriented database designed for ease of development and scaling.

Below given table shows the relationship of RDBMS terminology with MongoDB
RDBMS
MongoDB
Database
Database
Table
Collection
Tuple/Row
Document
column
Field
Table Join
Embedded Documents
Primary Key
Primary Key (Default key _id provided by mongodb itself)

Install MongoDB On Windows

To install the MongoDB on windows, first doownload the latest release of MongoDB from http://www.mongodb.org/downloads  Make sure you get correct version of MongoDB depending upon your windows version.

Install MongoDB Service

After installation we need to run MongoDb service.

1. Open command prompt in administrator mode.
2. Go to path C:\Program Files\MongoDB 2.6 Standard\bin

3. Make 2 directories in C drive. Run the below commands.
  mkdir c:\data\db
  mkdir c:\data\log


4. Run the below command
  
   echo dbpath=c:\data\db>> "C:\Program Files\MongoDB 2.6 Standard\mongod.cfg" 


5. To run the service run below command. In this service name is "MongoDB 2.6 Standard"

   sc.exe create MongoDB binPath= 
"\"C:\Program Files\MongoDB 2.6 Standard\bin\mongod.exe\"    
--service --config=\"C:\Program Files\MongoDB 2.6 Standard\mongod.cfg\"" 
   DisplayName= "MongoDB 2.6 Standard" start= "auto"


you will get the message service created successfully.


6. After installation go to service.msc and you will see Mongo Db service in the list.


7. To start the service write below command.
  
  net start MongoDB


you will get above message service was started successfully.

8. To check the service is running go to run and write service.msc and see service is running as highlighted in below screenshot.


Enjoy Mongo Db and create your collection(table).

Thanks for reading this article.


Tuesday 6 January 2015

Implement Swagger (Swashbuckle) - Web API Help Page


Web API Documentation using Swagger

Swagger is the best way to create proper documentation for your web API. Creating documentation for your Web API is a huge success.

Swagger is framework for describing you API.

Steps to Add Swashbuckle to ASP.NET Web API

1. Install the Nuget Package


Open NuGet Package Manager Console and install the below package:

Install-Package Swashbuckle


Or

Right click on the API Project and click Manage NuGet Package and search "SwashBuckle" as shown in below screenshot.

Once this package is installed it will install a bootstrapper (App_Start/SwaggerConfig.cs) file which initiates Swashbuckle on application.

2. Enable generating XML documentation


This is not a mandatory step however, it is quite useful when you are using complex model.

Right click on your API Project ---> Go to Properties --> Select Build
See the below screenshot.


Select the checkbox "XML" documentation file.


3. Configure Swashbuckle for using XML Comments


Go to App_Start and open Swagger.config. Use the code below and give the same path that you mentioned in Step 2. This setting is only for version 4.1.0. For above version like 5.0 no need to do below settings. As Bootstrapper is not available in new version.
public class SwaggerConfig
    {
        public static void Register()
        {
            Swashbuckle.Bootstrapper.Init(GlobalConfiguration.Configuration);          
            SwaggerSpecConfig.Customize(c =>
            {
                c.IncludeXmlComments(GetXmlCommentsPath());
            });
        }

        private static string GetXmlCommentsPath()
        {
            return Path.Combine(System.Web.HttpRuntime.AppDomainAppPath, "bin", "DentalServices.CarrierBestWay.Api.XML");
        }

    }

4. Annotating your API methods


Open your Controller Web API method and add Response Type. Again this is not mandatory to add Response Type but it is quite helpful to get your method information.

 [HttpPost]
        [ResponseType(typeof(Rule))]
        public IHttpActionResult Post(Rule model)

        {
          //your code
        }

5. Run the Swagger


 Run you Web API Project and write "Swagger" at the end of the URL.
like this http://localhost:64850/swagger.

The page will open like below screenshot which contains all you web API methods
with Response Type description. You can run you method directly from here like Chrome PostMan and Fiddler. It is very helpful.


In attached screenshot there are 2 methods, one for GET and one for POST. Click on GET method it will expand like below screenshot form where you can run you GET method directly from here. See Press the "try it out" button. It is giving the description that in GET method you will get Rule collection.


Same in case of POST method. you can test you POST method directly form this page.

That's all about the post, hope you like it.


How to find the reason of HTTP Error 500.30 - ASP.NET Core app failed to start in Azure App Service

HTTP Error 500.30 - The ASP.NET Core app failed to start If your web app is throwing an error HTTP error 500.30 then how to find the root ca...