Azure Backup
Azure backup is a service to provide a solution to backup your data and recover it from the Cloud.
What do you want to backup?

As shown in the above snapshot, you can backup Virtual machines, File Share, SQL Server, SAP Hana database running on Azure VMs.
In this article, we will pick a simple use case for backup of File Share. Let start with adding a Backup Service.
Step 1: Go to Create a Resource & select Backup and Site Recovery as shown in the snapshot below

Step 2: Click on the Create button as shown below.

Step 3: Create Recovery Services Vault, Create/Select the existing Resource Group. Enter the vault name and select the region and press the review + Create button.

Step 4: It will create a new vault for you. Now Go to a resource that you have just created and click the Backup button as shown below.

Step 5: We are going to create our first backup. You start your back up with a goal. Azure backup runs on both Azure resources or On-Premises resources. We will select Azure in the workload and Azure File Share as a backup. Click on the Backup button as shown below.

Step 6: There are a couple of things we need to do here. You need to select an Azure storage account where you have Azure files and you want to backup. If you don't have an Azure storage account then you first create the new storage account and then create a new File share and then place some files there.
Once your storage account is ready then you need to follow the below steps.
- Chose the existing storage account, as I selected below "azstoragebackup" as shown below. I have only 1 file in the file share i.e. test_file.png
- Click on the Add button, it will open the right panel.
- Select the File share folder. I have selected backupFileShare
- You need to create your new policy
- You need to specify at what time you need a backup.

Step 7: Backup Policy
- Specify the time and for how many days you need a backup.
- I have selected 10 PM and for 5 days only.
- Press the enable backup button.

Step 8: Go to Resource Services Vault --> Backup Items and you will find 1 item in Azure Storage backup.

When you click on the Count(1) then you can see your backup is created successfully

Restore Backup
You can click backupfileshare Items for restoring the backup as shown above.
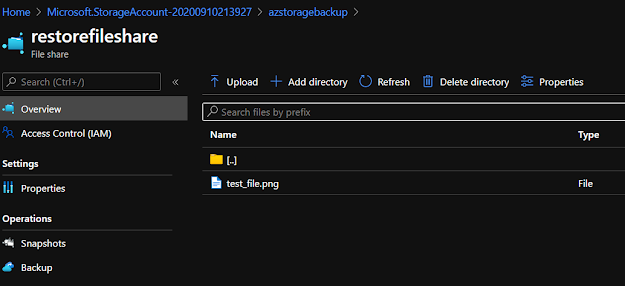
You need to specify the storage account where you want your backup. Also, you need to specify the file for backup. Once your press the restore button it will automatically restore the backup in that folder.

As shown in the snapshot below. I have opened my restoreShareFile Storage and you can see the file there. It successfully restored the file from the Backup.

This is all about this article. I hope you like it.


nice read! Thanks for sharing.
ReplyDeleteI think that is one of the so much vital information for me. And i'm glad studying your article. But want to statement on some common issues, The website taste is ideal, the articles is in point of fact excellent : D. Excellent job, cheers
ReplyDeleteFirst of all I would like to say superb blog! I had a quick question which I'd like to ask if you do not mind. I was curious to know how you center yourself and clear your head prior to writing. I've had a hard time clearing my thoughts in getting my thoughts out there. I do enjoy writing but it just seems like the first 10 to 15 minutes are generally lost simply just trying to figure out how to begin. Any ideas or tips? Kudos!
ReplyDelete