Window service
Window service is the application that run in background and perform various tasks.
How to create window service?
Its very easy to create window service. Follow the steps mentioned below
Step 1
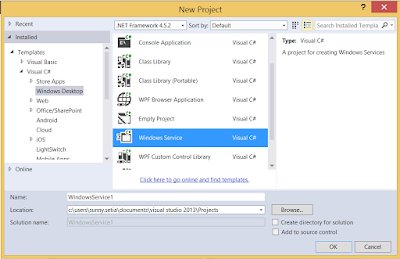
In visual studio 2013, File --> New Project --> Visual C# --> Windows Desktop --> Window Service.
In Visual Studio 2015, File --> New Project --> Visual C# --> Windows --> Classic Desktop --> Window Service.
Give the appropriate name to window service. I've given MyFirstWindowService and press ok.
Step 2

Step 3
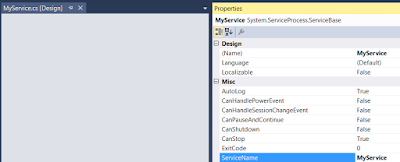
Right click on MyService.cs designer file and click properties as per below screenshot and changed the ServiceName.

Step 4
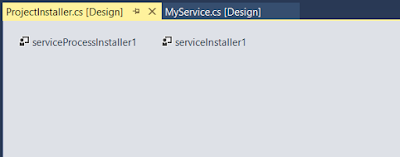
Right click on MyService.cs designer file again and click AddInstaller option. Designer will add Program.cs file and ProjectInstaller with 2 controls
2, ServiceInstaller1

Step 5
Right click on serviceProcessInstaller1 and select properties and change Account to LocalSytem

Step 6
We did all the setting now its time to write some code.
Step 7
Right click on MyService.cs file and select View Code.
You can see we have 2 methods in the file. OnStart, OnStop we will write our all code in these 2 methods. In the article service will write text in notepad file.
When service will start, It will write something in notepad. After every minute service will append date time in notepad file.
When service will start, It will write something in notepad. After every minute service will append date time in notepad file.
1. Initialize the timer in the code above constructor.
Timer timer = new Timer();
public MyService()
{
InitializeComponent();
}
2. On Start Method write below lines
protected override void OnStart(string[] args)
{
WriteFile("Service Started " + DateTime.Now);
timer.Elapsed += new ElapsedEventHandler(AddNewEntry);
timer.Interval = 60000;
timer.Enabled = true;
}
AddNewEntry is the method that will run after every minute. because we have set the timer interval to 1 minuete.
private void AddNewEntry(object source, ElapsedEventArgs e)
{
WriteFile("New entry at " + DateTime.Now);
}
3. OnStop Method
protected override void OnStop()
{
timer.Enabled = false;
WriteFile("Service Stopped" + DateTime.Now);
}
4. WriteFile private method
WriteFile is the private method that will write file after every minute.
private void WriteFile(string content)
{
FileStream fs = new FileStream(@"E:\SunnySetia\MyService.txt", FileMode.OpenOrCreate, FileAccess.Write);
StreamWriter sw = new StreamWriter(fs);
sw.BaseStream.Seek(0, SeekOrigin.End);
sw.WriteLine(content);
sw.Flush();
sw.Close();
}
Code will look like below screenshot
How to install window Service?
Step 1: Open Visual Studio command prompt in administrator mode.
Step 2: Go to location where project in placed. In my example my project is located in E:\Sunny\WindowServiceVS2015\MyFirstWindowService\MyFirstWindowService
Step 3: Install the exe file located in bin\debug folder.
Step 4: For installion, you need to use installutil command as per below screenshot.
Step 4: For installion, you need to use installutil command as per below screenshot.

Step 5: Press enter to install the window service.

If you followed all the steps then you will get above message.
If you are getting Exception while installing the exe file then use Release folder rather than Debug folder.
E:\Sunny\WindowServiceVS2015\MyFirstWindowService\MyFirstWindowService\bin\Release.
Step 6: Go to Start --> Control Panel --> Open Control Panel --> Select Administrative Tools --> Computer Management --> Services and Applications --> Services --> Open services
or In run command write services.msc
Now you can you service MyService in Services list. Look at the screenshot below.

Step 7: Right click on MyService and Press Start. After start
Step 8: Go to notepad file location and you can see window service writing in notepad file.

Step 9: For stopping the window service. Right click on service and press stop.
Once you stop you can see updated notepad file.

Step: 10 For uninstalling, you need to write installutil servicename.exe -u as below screenshot

That is all about window service. I hope you like it.


No comments:
Post a Comment